While there is more to Logo than turtle graphics, I suspect drawing with turtles holds a special place in many of our hearts. With Berkeley Logo (ucblogo) under active development and available for modern operating systems (including OSX, Windows, and Linux), it feels like a natural fit for generating interesting shapes to plot on a modern plotter like the AxiDraw.
The Logo environment is designed to make it easy to jump in and get started drawing. In fact, something interesting to plot can be produced in a single line:
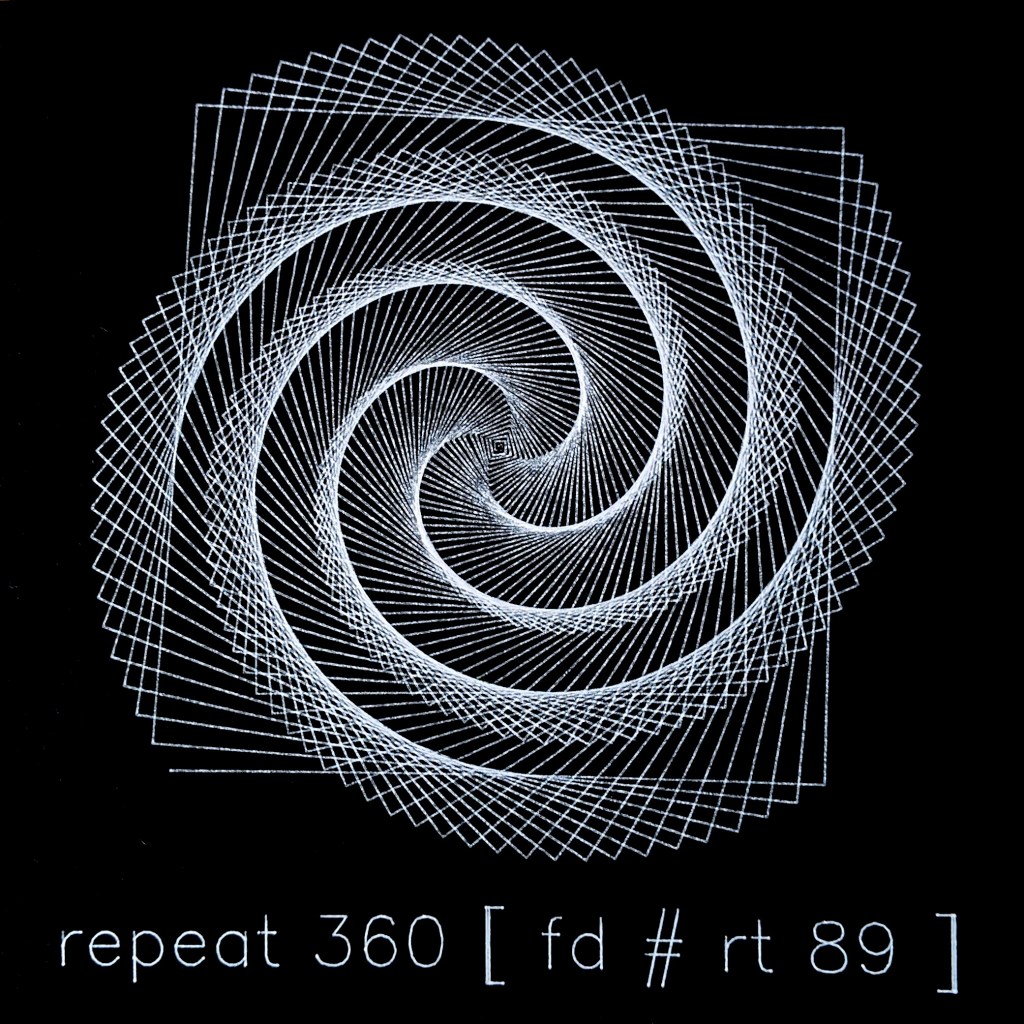
REPEAT 360 [ FD # RT 89 ]
In fairness, there is a bit of “code golf” going on in that line; so, it is expanded below with commentary:
REPEAT 360 [        ;; Repeat the following commands 360 times

  FORWARD REPCOUNT  ;; Tell the turtle to move forward
                    ;; as many steps as the current
                    ;; repetition. For example:
                    ;;
                    ;; The first time -> 1 step
                    ;; The tenth time -> 10 steps
                    ;; The three hundredth time -> 300 steps.
                    ;; etc.

  RIGHT 89          ;; Tell the turtle to turn right 89 degrees,
                    ;; just a little less than a right angle,
                    ;; so a spiral shape is drawn.
]
Going from an on-screen drawing to the plotter is often another challenge. Fortunately, Berkeley Logo has a command to export the current graphics window to an EPS (Encapsulated PostScript) file. This saves the drawing made by the turtle in a format suitable for importing into Inkscape and, from there, sending to the plotter.
ℹ️ Note: FILL, PENERASE, and PENREVERSE commands are ignored when exporting to EPS. This tends to line up with my expectations for plotter art, so is not a significant limitation for me.
Looking ahead a bit, there’s one more step before exporting to EPS. By default, the EPS export will contain black lines on a black background. This can make it harder to initially work with in Inkscape (the result actually looks like the import didn’t work, since it appears as a large “empty” rectangle). To prevent this situation, change the background color:
SETBACKGROUND 11
In this case, 11 is the code for the AQUA color. Any color which provides good contrast with both the white lines in the Logo graphics window and the black lines in the EPS file will work here.
ℹ Note: the exported line color can also be changed; but, since the pen in the plotter will determine the final result, I leave it as the default black so it contrasts with the default white background in Inkscape.
Having done this, the command to export is a another single line:
EPSPICT "LOGOSHAPE.EPSThis will save the file in your Documents folder and it is now ready to be imported to Inkscape.
ℹ️ Note: on Windows, there are extra steps involved before importing EPS files for the first time in Inkscape.
In Inkscape, select the File Menu, Import Menu Item. Find and select the LOGOSHAPE.EPS file. This will result in a popup dialog with a preview:

Leave the options as the defaults and click OK. This will result in the Logo turtle drawing being placed into the document:
Right click on the drawing and select the Ungroup context menu item:
This breaks apart the background rectangle and the drawing into two distinct items. This can be seen due to the dashed line rectangle around each:
Deleting the aqua background item results in a vector graphic which can be worked with in Inkscape as you would any other vector graphic:
For my plot, I used Hershey Text to add the Logo program beneath the image it produces and then plotted it using a white pen on black paper: